Chris and Brandy came over yesterday to play! Brandy came over to see if she could help me make a decent looking mirror out of sugar. Chris came over to play with Des and spent some time playing with gum paste - she made some super pretty flowers.
The night before, I made some frames out of gum paste to pour the sugar into. The first mirror we made was poured directly on top of the tin foil. At first we thought it was great, but a few minutes later, Chris became rather fascinated with the crystallization that was occurring. Chris could be seen intently watching the sugar for the next 15 minutes or so...
We then decided to pour the sugar onto parchment paper, deciding that the crystallization (it only happened near the tin foil) was the tin foil's fault. We tinted the sugar with a little bit of violet to give it a less brassy colour. We were very thrilled with the results once we placed the pane onto tin foil after it cooled.

The final gum paste frame we had left for the night was the largest one. Unfortunately, we cooked the sugar too slowly and it started to caramelize just before it reached the required temp. We poured it anyway, but it's now living in the trash can.
Showing posts with label flowers. Show all posts
Showing posts with label flowers. Show all posts
Wednesday, June 4, 2008
Mirror Mirror
Monday, February 25, 2008
Sugar flowers
So I ventured into the world of sugar paste the other day. Made a batch, and then attempted to made a flower with it. I made my own petal template and then used shot glasses to help the pieces keep shape. 


I sort of managed it, but Des found the flower and it died :(
So I did some research and found out that having the proper shape cutters, and technique was really key to getting decent flowers. I found a really awesome starter kit at Michael's chock full of cutters - and a very good instruction guide. With these new tools in hand, I tried again. 

Until I can afford better cutters, and proper petal and leaf veiners (this set is very.. hmm.. novice? but that's what I am, soo..) I'm really pleased with this $20 purchase.
Another evening of flower making (these photos reflect the fruits of my labors for the evening - yes, it is that tedious, but I also have a little girl at my feet who needs attention, so I'd say a total of maybe an hour, hour and half of work - a few flowers died due to their delicacy ) I will move on to the humming bird, and then.. cake assembly!
Monday, February 18, 2008
Sugar!
My niece-in-law Barbara came over today to play with sugar. We had a grand 'ol time learning what we could in working with this medium. We came together with a solid watching-of-The-Food-Network-knowledge, as well as having read these two (one and two) very informative sites. I can't speak for Barbara, but I felt as if this was going to be an easy, conquerable task - something we could do and turn out with something AMAZING by the end of the day. Oh boy was I wrong.
Lessons Learned:
- We are freaking awesome and can do ANYTHING with sugar, we ROCK~!


- 300F is not hot enough - our pulled sugar pieces wilted, and never really ended up hardening, somewhere near 315F was a much more successful final temperature for our sugar- but the sugar hardened much much faster

- FIRE should be used sparingly - we tried using the blow torch directly on a spot we wanted to "weld" and ended up with some rather large holes... heating a knife, and then using the flat side of it against the seam seemed to be far more effective for mending

- Sugar sculptures can apparently explode.


- Sugar sculpture is really really hard, and we have a long way to go, and a whole lot of practice in front of us before we can really say that we have any clue what we are doing
Saturday, February 9, 2008
butterflies
Had a few seconds to play with sugar today - but I burnt my finger so I stopped, all I got done was making a butterfly, and a very very failed flower.

This was supposed to be a fluted flower, but I had trouble getting the petal shapes right - and then I waited too long to shape it (just cupped in my hand, really) so the petals broke. it's a horribly ugly flower, if I do say so myself.
Thursday, January 31, 2008
Garden?
Now that I've caught this thing up with all of what I have done, I can post at a more realistic pace - more details on the trial and error, less lengthly babbly posts where I try to explain too much.
Grandma's birthday is coming up. 80, and she's throwing a big 'ol bash for the occasion. I believe the expected count is around 30. And I've thrown my hat in to make a cake - this makes me very nervous, and I haven't *officially* said I'd do it yet, since so many people will be there, and I want to be happy with what I end up brining. So.. I'm practicing the grand idea I've come up with.
Oh, by the way - if your name is "Grandma" and you happen to be my Grandma - and you want the final cake to be a surprise, you should stop visiting this blog until your birthday!
Otherwise, read on!
A humming bird visiting a flower - or flowers, on top of a large cake.
Here I shall include an artist's rendition, care of MS Paint.
Quite fabulous, don't you think? Yes, I have mad skills.
How to do this, you may ask? Ah, well first, to start with the bird! I baked a duck shaped pound cake* last night (2 batches = one duck), and then proceeded to chop it up and reassemble it to vaguely look like a hummingbird. 

I am quite pleased with the results.
I then spent some painful** tv-watching time cutting and bending coat hangers and mesh baskets from the dollar store to produce a frame*** for the wings. I plan on this being the support for the fondant - as there's no way it can support itself in such a large format without help.
Now to make a frame for the tail, and figure out some support for the head (it fell off after sitting upright for a little while. oops!)
*Sour Cream Pound Cake - The New Better Homes and Gardens Cook Book
1/2 c. butter
3 eggs
1/2 c. dairy sour cream (i used plain yogurt)
1 1/2 c. all purpose flour
1/4 tsp. baking powder
1/8 tsp. baking soda
1 c. sugar
1/2 tsp. vanilla
- Allow butter, eggs and sour cream to stand at room temp for 30 min. Grease and flour cake pan (makes standard loaf pan). Stir together flour, baking soda, baking powder. Set aside.
- In mixing bowl beat butter high speed for 30 seconds. Add sugar - beat for 10 mins or until quite fluffy. Beat in vanilla. Add eggs one at a time, beating 1 minute after each addition. Alternatly add flour and sour cream beating until just combined.
- Pour into pan. bake at 325 for about an hour.
**No, really, painful. I have little cuts all over my hands :(
***"But they aren't allowed to do such things in the cake contests! A non-edible frame is cheating!" you say? Yeah, well get over it. It'll be totally sweetawesome when I'm done with it.
Wednesday, January 30, 2008
Quilt Cake
My most recent cake was the finalized version of the quilt. I don't have as much photo documentation of that process - as I only just decided to start this blog. Oh well.
Anyway. Party for my Mom was on Saturday.
Wednesday:
I made two batches of M.M. fondant (I only used the prescribed 1/2 Crisco per batch this time - stickier in the initial kneading, but the overall texture in the end was soo much better and easier to work with).
I also made 1 1/2 batches of this fantastic (I do mean fantastic) White Chocolate Butter Cream frosting. I used Ghiridelli white baking chocolate, and I really think that added to the richness.
In both of these frosting recipes, I added some almond extract - because the final cake would be chocolate cherry - I figured the almond would add a nice hint of cherry flavour.
Thursday:
I baked the Dark Chocolate Cake in heart shaped silicon pans. I was worried they'd warp, but they didn't - my worst problem was that the cake stuck in the end - even though the pans were silicon and sprayed with Pam. Dangit.
I also started to play with the fondant colours, practicing marbling and texturing techniques and such. To help me, my friends Chris and Brandy came over to play, and learn what this cake decorating was all about we had fun. After leveling the chocolate cake, I had some leftover pieces, and so, we made a cake with our play fondant.
Friday:
I spent the first few hours kneading colours and trying as hard as i could to match the colours from the original quilt. This took a really really long time - so many different colours - and not to mention my daughter at my feet and, you know, needing me to interact with her every once in a while :)
After the fabrics were made it was just a matter of cutting and assembling again - this time though, I had a square fondant cutter, thank god. So my shapes weren't wonky, and everything was much more uniform. That, and cutting took so much less time...
Assembling the pieces was a far more tedious job this time, however. I decided that I would lay out a large piece of fondant, rolled as thin as usable - and then lay each piece on it, after wetting the bottom and edges slightly, so that it would stick. So each piece had to be layed out precisely - since once a wet piece of fondant touched other fondant, it usually stuck pretty good and would make a big 'ol mess to repair.
Many hours later.. all of this was done. So I layered the cake with frosting and cherry pie filling - and then lightly frosted it all over. I painstakingly picked up my quilt and layed it down on top of the cake. After that it was all a matter of forming, prodding, and pinching the fondant to fit the cake. Sadly, I again over-judged how much butter cream to use - so there was some oozing - not only that, but the cherry filling caused some havoc as it squished it's way out in some places.
After I was happy with the lay of the fondant, I pulled out my little texture wheel thing and quilted the cake!
 To my delight, my mom recognized it immediately as her quilt.

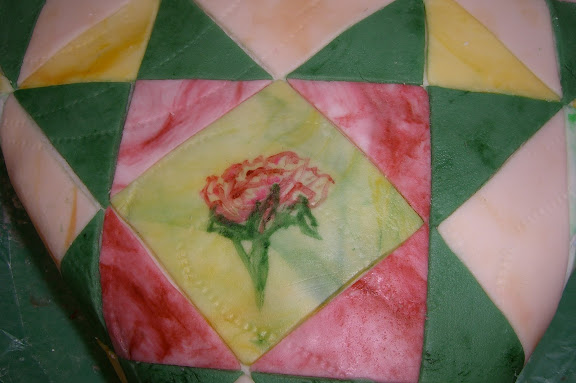
Test Fondant - A Quilt
So, my mother's birthday was coming up, and my husband unwittingly made the absurd suggestion that I create a quilt cake. I didn't think it was a joke, however, I loved the idea! So, I had to find out if it was something I'd be able to pull off.
My mom has has had one of her quilt designs published, it's called Asilomar Sunset - so I thought this would be the perfect design to use for her quilt.
Lucky for me, the book layed out all the instructions - piece sizes, number of fabrics... I figured the best way to go about this would be to make a single fondant fabric for each fabric in the design. This turned out to be 11 different designs. (Erk!)
I marbled, I kneaded, I squished and rolled out fondant for a good few hours, and in the end had 11 different rolled out pieces of fondant. Two of the fabrics in the quilt were florals - so I pulled out a paint brush and dye and painted right on the fondant!
After the fabric was complete - then came the cutting and piecing. This took far less time than I thought it would, however I only had a straight edge and a knife, so many pieces were not quite the right sizes to fit.
After laying all these pieces out on wax paper, I realized I would need some way to place it all on the cake - so I rolled out a large piece of leftover fondant, layed it on top of the pieces, and rolled it all together, to stick the pieces to the fondant.
Not the best idea. in the end the pieces became misshapen and the yellow fondant backing mooshed out between the pieces. It worked, but it was ugly.
Anyway.. in the end I knew that although the technique would need some adjustment - the idea was plausible.
Tuesday, January 29, 2008
Second Cake - Happy Birthday Des!
Somehow, the second time I did this cake, so many lessons had been learned that I pulled off something that impressed even me.
I'll take you through the process..
The birthday party was on Saturday.
Wednesday:
I made a batch of Marshmallow Fondant, and a batch of butter creme frosting.
Thursday:
I baked the duck with pound cake - and a sheet cake with a white cake mix. I also started to play with the fondant, making a water lily and some lily pads. I coloured the fondant by kneading in gel food colours (available at your local Upermarket - it adds less moisture than traditional food colouring). While the lily pads were freehand, the flour was reliant on some great fondant cutters.

The white powder you see all over is corn starch to assist in the stickiness of the fondant (I found in later attempts that this was due to way too much Crisco). I stored these in the fridge after completion.
Friday:
I started the major assembling....
First, I frosted the duck (made the day before so that it would be cooled entirely to room temperature) with a layer of butter creme frosting. This is to help the fondant stick to the cake. They say you should frost and let it sit for a while before laying the fondant to help with he sticking.. so I then coloured the fondant by kneading in some yellow food colouring. And then rolled it out to a massive sheet. Lifting the fondant sheet was not easy, even if i rolled it back on itself - it had a tendency to crack (the recipe on the baking 101 site says cracking means it needs more moisture - I added more Crisco.. this ended up being part of my problem, I used *way too much* Crisco, so the integrity of the fondant was lessened, it was too soft) - anyway. where was I? I placed the fondant over the duck and started to push, prod and mold it into shape. After much work, I got to a point where I was happy with it. I then molded and attached wings and feathers (again, the leaf fondant cutters, perfect shape!). Fondant is cool in that if you need it to stick to itself, just wet it!
 Now for finishing touches - some sprayed on colour accents, thanks to my husband, and some black eyes, and we have a duck!
 Now for the sheet cake - very carefully, I leveled the top with a serrated knife. I then cut it in half, for filling. On each inside of the halves I spread a very thin layer of butter cream - this was so that the filling wouldn't seep into the cake and make it all mushy. I then spread blueberry pie filling onto one side, and put the other side back on top.
Next came frosting - but first, you'll notice round rise in the cake - that is a plastic cake board, to support the duck later. I used a white store bought Betty Crocker frosting that I had dyed a bright blue. Then, I started placing green fondant cut-outs of - yes, the leaves again all around the edge.
 Finishing up - add the flour and lily pad.. some spray colour accents...
 Place the bird over the cake board anddd....
tada!
Subscribe to:
Posts (Atom)